When I think of handmade gifts for babies, crochet baby boot is always one of my first choices. Crocheting a pair of these cute little booties is a classic way to welcome a new little one into the world!
This free crochet pattern will teach you how to make soft and stretchy crochet booties that will be comfortable for your baby to wear. These easy crochet baby booties are so cute and make the perfect gift for a new baby girl or boy. Shall we get started?
Crochet baby boot pattern
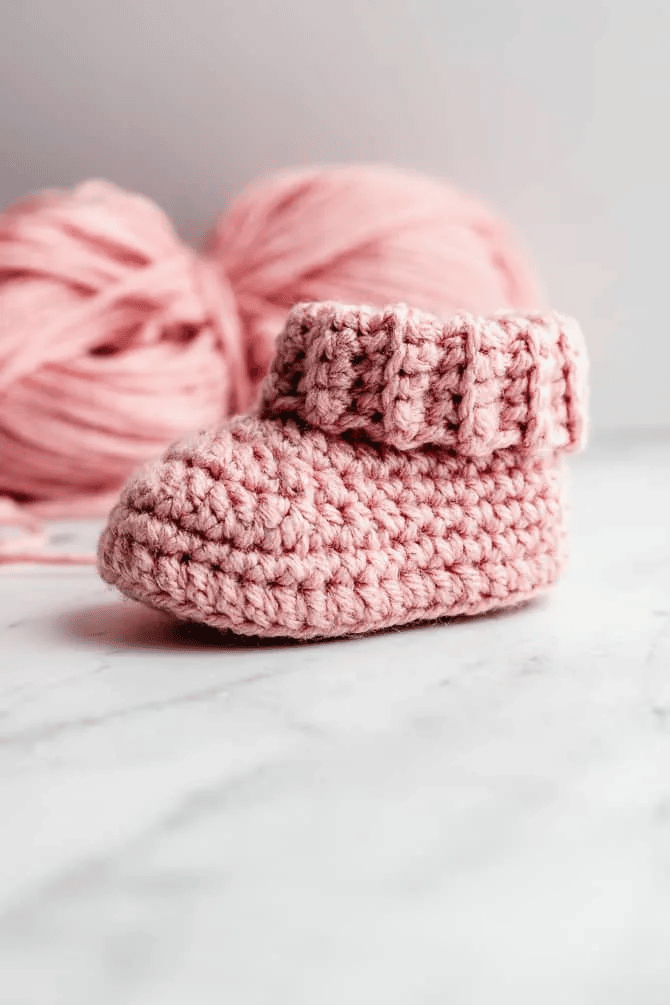
Are you looking for a cute and classic crochet baby pattern? Then this free baby bootie crochet pattern is perfect for you.
These cute booties make an adorable baby shower gift and a great addition to any newborn's wardrobe.
This professionally edited pattern will teach you everything you need to know to make classic baby booties.
It's an easy pattern made with basic crochet stitches, so it's perfect for both beginners and advanced crocheters.
It's a gender-neutral design that you can customize to suit the girl or boy in your life.
And of course, you can adapt the mold to fit all foot sizes.
Why I love this pattern:
The boots have a ribbed, folded cuff to keep little feet warm and comfortable without sacrificing style.
I also like that these booties are made with worsted weight yarn, so they work quickly when you need a last minute gift.
Best yarn for crochet baby booties
Baby booties are such a special item, and I'm sure you want to choose the best yarn for this project.
When thinking about what type of yarn to use to make baby booties, choose something that is super soft, hypoallergenic, and washable.
Wool yarns can be too rough for babies' delicate skin, and cotton yarns tend to be too stiff.
Premium acrylic yarns are a great option for crocheting baby booties. Yarns with a smooth, soft texture tend to be the best choice for babies.
To determine if your yarn is soft enough, rub it against your cheek or neck. If it feels soft to you, it will also be soft enough for your baby's feet.
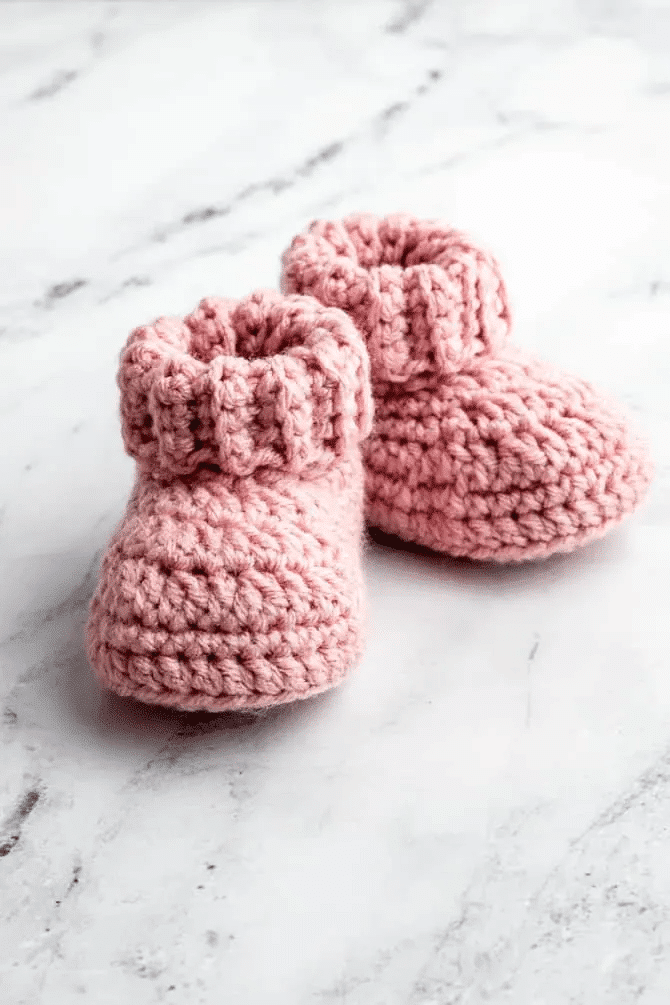
Standard of crochet baby boot cute
I know that many people start learning crochet to make items for a new baby. When designing this pattern, I wanted to create an easy baby bootie pattern for beginners that moms would love.
This is a simple and modern baby bootie pattern that is perfect for making baby shower gifts, baby's first Christmas, and other occasions. It is a gender-neutral design that you can customize with different yarn colors.
Crochet Baby Bootie Size Chart
As I’m sure you know, all babies grow at different rates. For the most accurate fit, see if you can measure your baby’s foot. Remember to add up to half an inch of extra wiggle room to calculate the correct sole size.
To check your gauge, I recommend working the entire sole section of the pattern and measuring its length. This way, you’ll know if you need to increase or decrease the hook size.
| Age | One size fits all | Recommend Hook |
| newborn | 3.5 | E/3.5mm |
| 0-3 months | 3,75 | G/4mm |
| 3-6 months | 4.25 | A/5mm |
| 6-12 months | 4,75 | J/6mm |
Classic pattern crochet baby boot
Difficulty: Beginner to Easy
Final size: 3 months (3.75″ sole length) See chart above for more sizes.
Materials
Wires: Worsted weight yarn (Category 4)
Crochet Hook: Needle G/4mm to make a 3.75″ long bootie
You will also need:
- Sewing needle
- stitch markers if desired
- ruler or tape measure, if desired
Periods and abbreviations
- slip stitch – slip stitch
- st/sts – point/points
- ch - chain
- pb – single crochet
- mpa – half double crochet
- shovel – double crochet
- sc2tog – single crochet two stitches together
- hdc2tog – half double crochet two stitches together
- dc2tog – double crochet two stitches together
- BLO – back loops only
Special points
I find that regular hdc2tog stitches can look a bit bulky, especially for small projects like baby shoes. Here's a different way to do a half-double decrease invisibly.
If you are familiar with single crochet invisible decreases for amigurumi, this is similar.
Invisible decrease in HDC:
Step 1: Thread the wire.
Step 2: Insert the needle into the front loop of the first stitch of the decrease.
Step 3: Insert the needle into the front loop of the next stitch in the decrease.
Step 4: Yarn over and draw up the first two loops on the crochet hook.
Step 5: Yarn over and draw up the last three loops on the crochet hook.
You can use this stitch whenever I call for a hdc2tog decrease in the pattern.
Pattern notes
- This standard is written in American/American terms.
- The sole and upper are written in joined turns. (You won't go turn the work between rounds.)
- The cuff section is written in lines. (You go turn the work between careers.)
- Use a stitch marker to mark the first stitch of the row/round.
- At the end of each row, join the row with a slip stitch to the first stitch of the same row.
- Chain 1 to begin a round. Chain 1 does not count as a stitch.
How to Read a Crochet Baby Bootie Pattern
Crochet patterns are written using many abbreviations and terms, which save space and make the patterns easier to read. Here are some tips:
- Unless the pattern says otherwise, assume you are going to the next stitch. For example, “3 hdc” means work 1 hdc into each of the next 3 stitches. If the pattern wants you to work 3 sc in the same spot, it will say “3 sc in next stitch.”
- ( ) Parentheses are used to indicate a group of stitches that should be worked together into one stitch.
- [ ] Brackets are used to tell you how many times you should work a particular step. The number immediately after the brackets tells you how many times you should do the step.
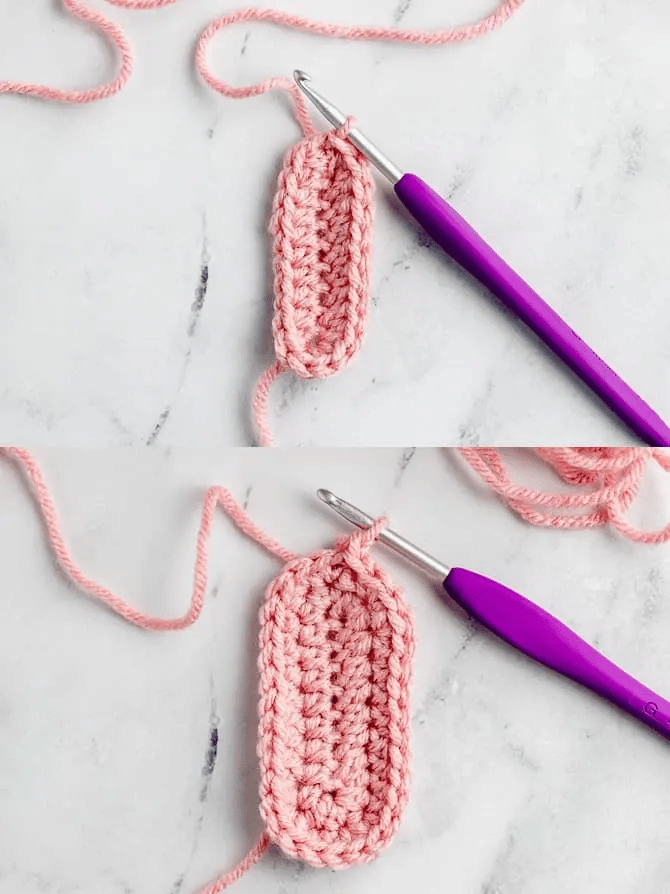
Single section
Career 1: 10 ch. In the second ch from the hook, make 2 hdc. 7 hcc. In the last ch, make 5 hdc. Continuing on the other side of the starting chain, make 7 hdc. Make 2 hdc in the last ch. Join with a slip stitch to the top of the first hdc. (23 stitches)
Career 2: 1 ch. In the same st, make 2 sc. 2 sc in the next st. 4 sc, 3 hdc. 2 hdc in each of the next 5 sts. 3 hdc, 4 sc. 2 sc in each of the next 2 sts. Join with a single crochet in the top of the first sc. (32 sts)
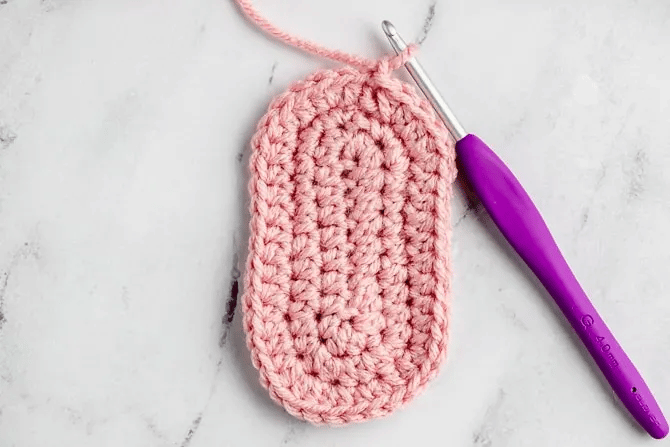
Career 3: Ch 1. Starting in first st, [1 hdc, 2 hdc in next st] twice, 7 hdc, [1 hdc, 2 hdc in next st] twice, 2 hdc in each of the next 2 sts, [1 hdc, 2 hdc in next st] twice, 7 hdc, [1 hdc, 2 hdc in next st] twice. Join with a slip stitch to the top of the first hdc. (42 sts)
Upper Section
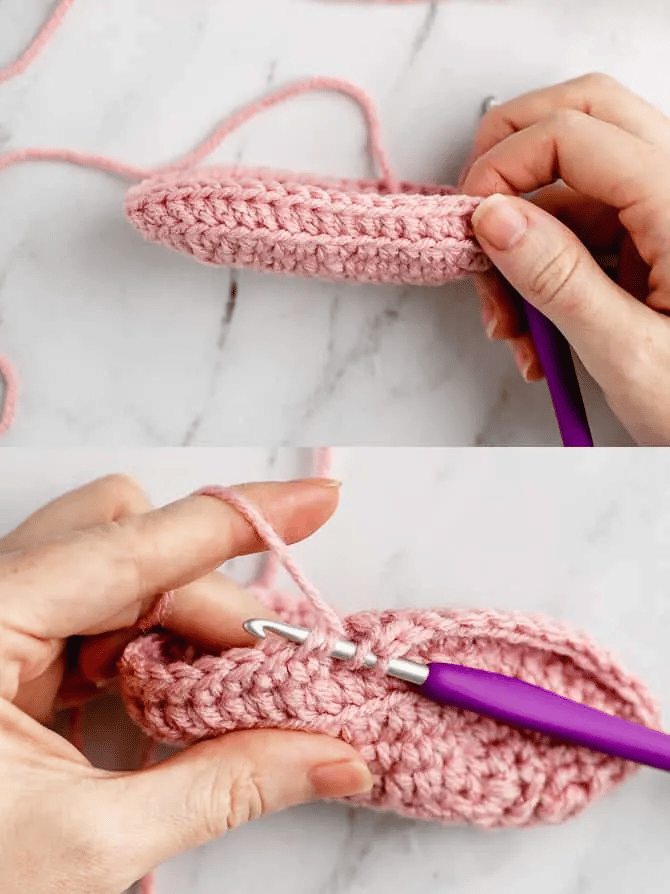
The top section is worked in joined rounds. Each round will start with a ch-1, which does not count as a stitch.
Important: Begin each row by crocheting the first stitch in the same stitch as the slip stitch junction, that is, the first stitch of the row below. Continue around.
When you reach the end of the row, join the first stitch with a slip stitch.
Here is an image to illustrate the joints.
Career 4: 1 ch. (Does not count as a stitch here, or in following rows.) Hdc blo in the same stitch and in each stitch around. Join with a slip stitch to the top of the first hdc. (42 stitches)
Career 5: Ch 1, sc in the same st and in each st around. Join with a single crochet in the top of the first sc. (42 sts)
Career 6: Ch 1, sc in same st and in next 10 sts, hdc, [hdc2tog, hdc] twice, [dc2tog, dc] 3 times, dc 2tog, [hdc, hdc2tog] twice, hdc, 6 sc. Join with a single crochet in top of first sc. (34 sts)
Career 7: Ch 1, sc in same st and in next 12 sts, hdc, hdc 2tog, 4 dc 2tog, hdc 2tog, hdc, 7 sc. Join with a single crochet in top of first sc. (28 sts)
Career 8: Ch 1, sc in same st and in next 11 sts, hdc, 4 dc 2tog, hdc, 6 sc. Join with a single crochet in top of first sc. (24 sts)
Notes: Some readers have said they are having trouble with their reductions looking asymmetrical or off-center. Here are some suggestions:
- First and foremost: the first stitch of each row must be made in the same stitch as ch-1.
- Second, be aware that the last stitch of round 5 will be about 2-3 stitch lengths to the right of center. This is normal – the seam shifting is caused by the shape of the crochet stitches – especially the hdc stitches. To compensate for the slanted seam, I shifted the decrease section in round 6. This moves the decrease section a few stitches so that the decreases line up exactly with the center line of the sole.
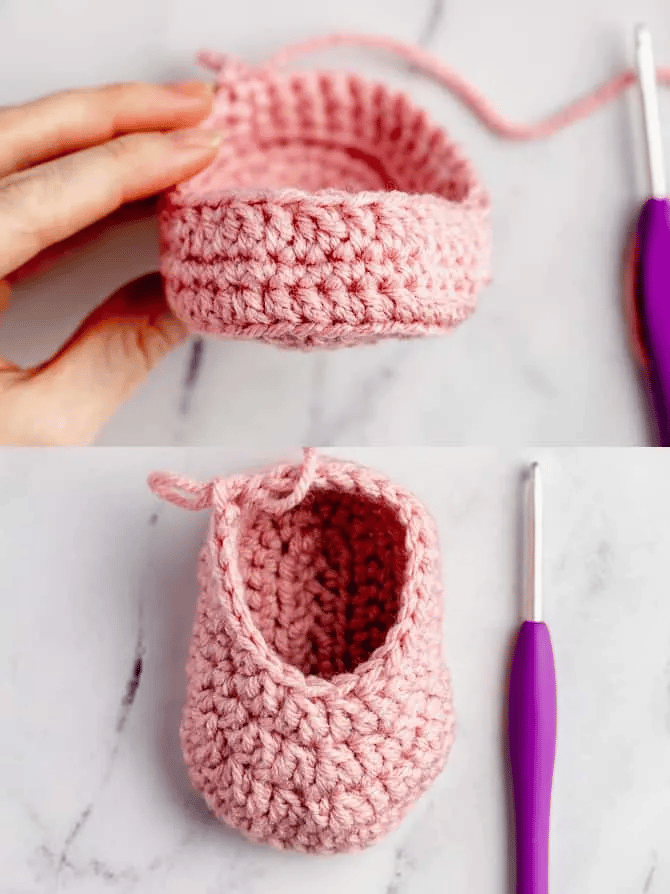
Ribbed cuff section
The cuffs are worked in rows. Rows of single crochet stitches create a flexible rib that you can fold over to make a cuff.
Notice: The ribbing rows are anchored to the previous round (“Top Round” 8) by making a slip stitch at the beginning or end of the row.
Career 1: Ch 9. Starting in the second chain from the hook, 8 sc. (8 stitches)
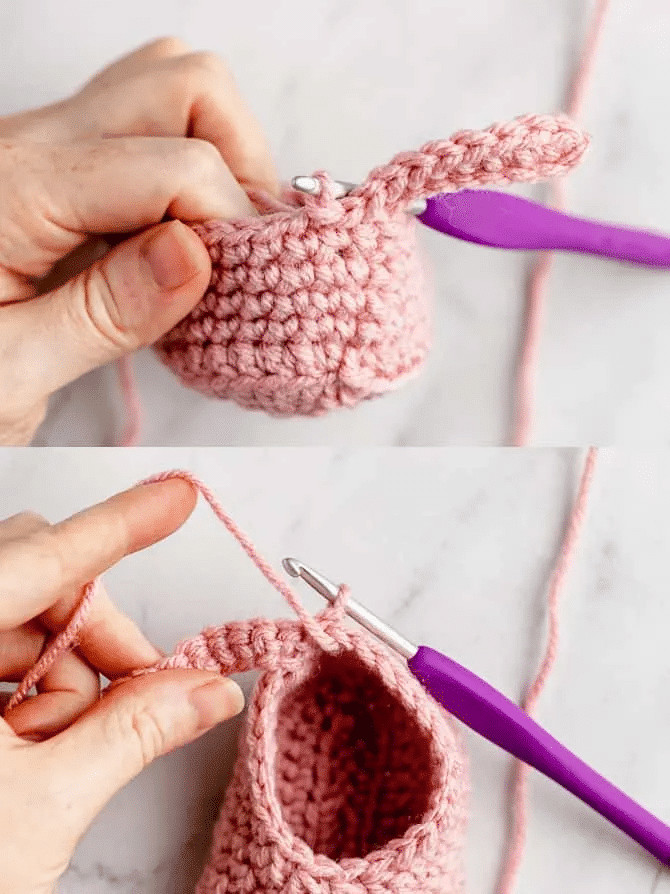
Slip stitch into the next stitch of Round 8 of the Top Section. This slip stitch anchors the row of single crochet stitches you just made into the stitches of the last row of the top of the bootie.
Then, make another slip stitch into the next stitch of row 8 of the top section. This second slip stitch counts as the turning chain for the next row.
Career 2: Do not chain 1, as the slip stitch you just made counts as your turning chain. Turn the bootie counterclockwise.time so that the working yarn crosses in front of your work. Bring the working yarn in front of your hook and to the back of your work.
Tip : I take this extra step of turning the work counterclockwise and passing the yarn in front of the needle to minimize a bump you can get when working with this additional ribbing technique.
Starting in the third stitch from the needle (remember to skip these two slip stitches), make 8 sc-blo.
Career 3: Ch 1 and turn. Starting in the second stitch from the hook, make 8 sc-blo. Slip stitch in the next stitch of the “top” round 8. Make another slip stitch in the next stitch of the “top” round 8.
Career 4: and all even rows: Follow the instructions for Row 2.
Career 5: and all odd rows: Follow the instructions for Row 3.
Finish
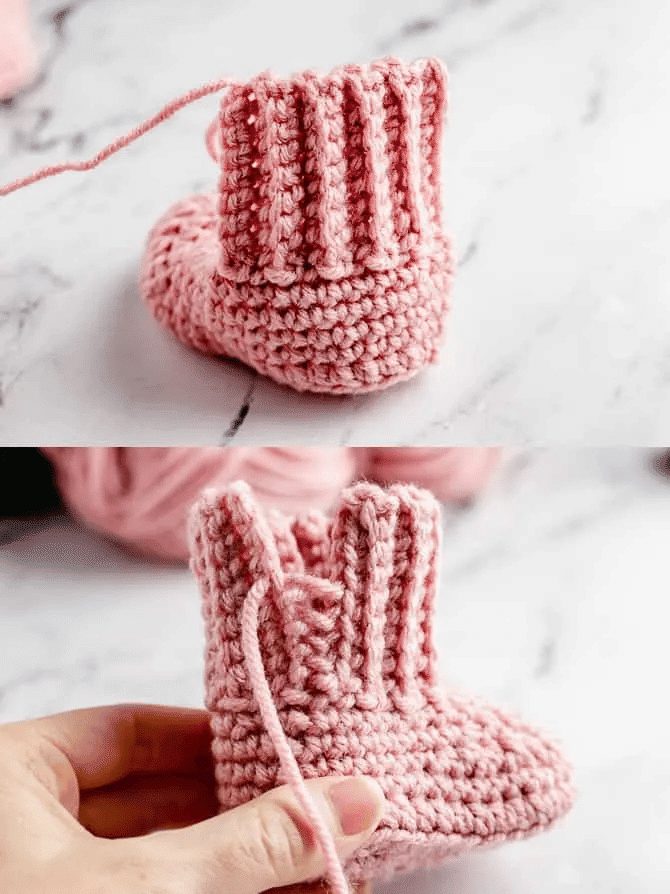
When you have made 24 rows of ribbing, cut the yarn and pull it through.
Leave a long tail of yarn and use it to sew the two ends of the ribbed section of the cuff together.
And there you have it, you've made adorable baby booties that any mom-to-be will love.
Did you like this amazing content? If so, share it with your friends and on your social networks. See exclusive and free content daily on our website. Blog of ideas and tips and take the opportunity to follow our Google News Channel. Thanks!