
If learning to crochet is at the top of your list, this Easy to understand crochet guide for beginners to help you. We often get this question: How do I learn to crochet? We’ll explain different parts of basic crochet knowledge, including what a crochet hook is, common crochet abbreviations, single crochet stitches, and even how to spell crochet (you’d be surprised)… all of which are perfect for absolute beginners.
We'll also look at all the different types of yarn you can use and suggest some free beginner crochet patterns. Crochet is sometimes misspelled as croshay, chrochet, crocet and crotche, but the correct way to spell it is crochet. If you come across a crochet pattern written backwards, rest assured that they are talking about the same thing I am going to teach you here.
Ready to get started? Keep reading to learn the basics of crochet, so you’ll be ready to start your first crochet project with confidence with these step by step crochet instructions for beginners.
Learn crochet from scratch in 5 steps
In this video that we are going to share from the channel JNY Crochet, you will learn a little bit of crochet step by step. Check it out:
Crochet chain, double crochet and single crochet
In today's video lesson we are going to share Bianca Schultz | Knitting and Crochet They will teach you how to start crocheting from scratch, showing you how to make chains, single crochets and double crochets. Check it out:
How to Crochet: A Beginner's Guide to Crochet
First thing's first: start crocheting now. As a beginner in crochet, this is the most important part. With our beginner's guide to crochet , I promise you can do it! I was a beginner once too. I can tell you that crocheting is not difficult and you will be glad you started.
I have written this crochet guide in an easy to understand way that will help all beginners learn the basic crochet knowledge needed to start their first crochet project! This crochet guide for beginners is an easy way and the best way to learn everything you need to know about crocheting. need to know about crochet studying about:
- Crochet needles
- Wire
- crochet stitches
- Crochet Abbreviations
- Weaving on yarn ends
- Crochet Template
- Juntando Fios / Mudando Cores em Crochê
- How to keep track of lines and points
Each of these topics above will help you learn how to crochet step by step in a way that you will want to continue learning more.
What is crochet?
Crochet is the art of creating fabrics by interlacing threads with a crochet hook. Sounds simple, right? Well, it is… I promise!
What materials or tools do I need to crochet?
While you really only need two basic crochet supplies as a beginner to get started, we also have a full list of our recommended products.
- Wire: Yarn comes in many weights (how thick) and yards. Certain projects use specific weights of yarn, but others—like blankets—can use virtually any weight. You can buy yarn online or in the store, but I always prefer to buy online. Online, you have a much wider selection and can choose from virtually any brand under the sun.
- Crochet hook: Crochet hooks come in a variety of sizes. The most common, however, is anywhere between a size of 3mm and 15mm. There are smaller and larger sizes than these, but they are only used for very specific use cases. Crochet hooks are generally used with specific yarn weights as well. For example, medium weight #4 yarn should be used with a 5.5mm or 6.5mm hook.
With all the different types of wires and hooks, the selections can be a bit tricky. However, luckily for you, almost every crochet pattern provides the details of what you need. The crochet pattern will tell you the exact yarn weight, yarn type, and preferred hook size. Then, with the right yarn and hook, you'll be well on your way to starting to make your first scarf, hat, blanket, or anything else.
What is a crochet hook?
A needle of crochet is a portable tool used to form crochet stitches. The different parts of a crochet hook are listed in this image and include the point, throat, grip, shank, and handle. It is important to familiarize yourself with the needle so that when you pick up a needle for the first time, you understand it and its parts before starting your first pattern.

Crochet Hook Sizes
There are more than thirty sizes different crochet hooks, and crochet patterns often require a specific hook size. The crochet needles are identified by their American or metric names. For example, a metric size 5.5mm hook is also called a size I-9 hook in the US. We conveniently categorize all of our patterns by which hook size is used. Here are the hook sizes we have crochet patterns for:
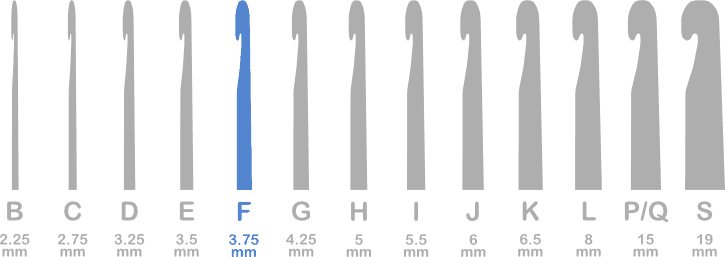
- 2.25mm (B-1)
- 2.75mm (C-2)
- 3.5mm (E-4)
- 3.25mm (D-3)
- 3.75mm (F-5)
- 4mm (G-6)
- 4.5mm (7)
- 5mm (H-8)
- 5.5mm (I-9)
- 6mm (J-10)
- 6.5mm (K-10.5)
- 7 mm
- 8mm (L-11)
- 9mm (M/N-13)
- 10mm (N/P-15)
- 15mm (W/Q)
- 16mm (Q)
- 40mm
Crochet hooks not only come in different sizes, but also in different materials and shapes. From hooks ergonomic, to steel or Tunisian hooks, each type of hook has a specific use. Making sure you get the right one is essential! I recommend starting with a medium weight yarn (#4) and a crochet hook 5.5mm (I-9) to start your crochet journey.
How to Hold a Crochet Hook
The two most common ways to hold a crochet hook are a pencil grip and the knife grip method.
- Pencil grip: Use your thumb and index finger to squeeze or hold the hook handle (see illustration above) like a pencil.
- Knife Hold : As the name implies, you will hold the hook like a knife, placing your thumb on the thumb rest or handle.
There are different ways to hold the hook , but the most important thing is to choose the one that works best for you. The general rule is hold the crochet hook with your dominant hand and the working yarn with your non-dominant hand. You can find videos on YouTube that will help you go through this process step by step.
Crochet threads
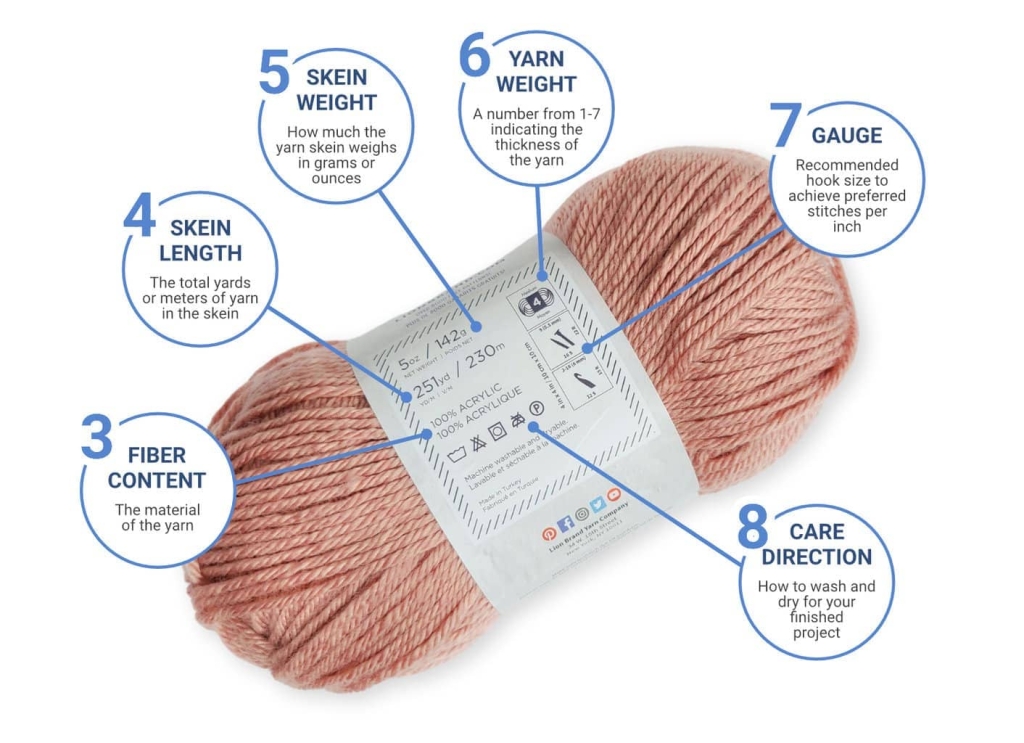
Yarns are available in many fibers, lengths, and weights. You can learn the qualities of a specific yarn by reading your label. Yarn thickness is used to determine yarn weight, which can be categorized into numerical weights from 0 to 7. The yarn weight It will also determine what size crochet hook you will use! To make things easier, most yarn companies include all of this information on the yarn label of each skein of yarn. So if you are unsure of what weight of yarn you have or which hook you need to use, check the label.
Yarn weight
Yarn comes in a variety of different weights, and the higher the number, the thicker the yarn. Here are all of our crochet patterns broken down by the weight of yarn they use:
- Weight 1 – Superfine
- Weight 2 – Fine
- Weight 3 – Light
- Weight 4 – Medium
- Weight 5 – Bulky
- Weight 6 – Super Bulky
- Weight 7 – Jumbo
There are many different types of wires, each made from a different fiber. Some yarns are 100% acrylic, wool, or cotton, while some are blends of each. Every fiber doesn't work for every type of project. For example, wool should be used in a sweater should not be used to make a blanket.
My favorite yarns for crocheting are four medium weight yarns (also known as worsted weight yarns) such as Vanna's Choice by Lion Brand, Brava Worsted from We Crochet or any cotton yarn as well. Both the yarns mentioned are 100% acrylic yarn, inexpensive and work perfectly for making crochet blankets!
How to hold yarn in crochet
There are a few different ways to hold yarn when crocheting. The first way is to wrap the yarn around your pinky finger, under your two middle fingers, and over your index finger of your left hand, starting with the end of the yarn. If you are left-handed, use your right hand and follow the steps above. The second way to hold the yarn is to hold it between your index and middle fingers as you work. This is the method I use as a crocheter and started many years ago. Whichever method you decide to use, just choose the one that works the easiest for you as a crocheter. Crochet doesn’t have to be difficult, so do whatever works best for you in crochet.
Crochet stitches and techniques for beginners
The chain and single crochet stitches are two of the most common and basic stitches that every beginning crocheter needs to know before attempting a project from a crochet pattern. Below, you will learn how to start crochet projects by studying beginner crochet stitches. I will also explain basic techniques for more crochet stitches, such as the slip stitch, half double crochet, and double crochet stitch too! After learning all about the different points Below, you'll be well on your way to starting crochet!
Basic Crochet Stitches for Beginners
- chain stitch
- Single crochet
- slip stitch
- Half Crochet Stitch
- Double crochet
- Triple Crochet
Learn more about each simple crochet stitch for beginners below with our easy instructions. Once you get the hang of these common crochet stitches, you can move on to more advanced stitches in your crochet projects.

#1. Chain stitch (corr.)
One chain stitch é um ponto de crochê simples que geralmente forma a base do que os pontos de crochê são trabalhados durante a maioria dos projetos de crochê. Você ouvirá esta primeira linha às vezes chamada de corrente de base, que é apenas uma série de pontos de corrente trabalhados um após o outro. Há um laço frontal e um laço traseiro de cada corrente (ou ponto) que se assemelha a um V. O número de correntes em um padrão de crochê pode determinar o comprimento ou a largura de um projeto de crochê.
- To make the first stitch, start by making a slipknot.
- Insert the needle into the slip knot stitch first, pass the yarn over the needle shaft from back to front, and hold it with the throat of the needle.
- Pass the hook yarn through the slipknot and onto the hook. This movement will make a dc stitch.
- Repeat steps two and three for the next stitches until you have the desired number of stitches for a pattern. One loop will remain on the hook.
When starting out, I suggest doing as many chain stitches as you like in a row to get used to doing this crochet stitch. Swivel currents: A turning chain is the chain made at the beginning of a row (or at the end of the row) with your hook to bring the yarn up to the height of the next row. The number of turning chains will depend on the crochet stitch you are using.
#2. Single Crochet Stitch (sc)
Single crochet stitches are one of the first beginner crochet projects you do! This first project usually consists of rows and rows of single crochet stitches to make a scarf, towel, or even a blanket if you’re feeling adventurous.
Single crochet stitches after each other create a tighter crochet fabric in projects and are the perfect stitch for beginners to ease into crocheting.
- Insert the crochet hook from front to back into the center of the second chain from the hook.
- Pass the wire over from the needle and pull the yarn back through the chain from back to front (2 loops on the hook).
- I and pull through both loops on the hook.
- Learn more about the single crochet stitch and how to start making single crochet rows for your next project.
#3. Slip stitch (single crochet)
One slip stitch is a stitch used in surface crochet as well as in patterns to create texture and uniqueness.
- Insert the needle into the designated point
- Yarn over and pull back through the stitch and through the loop on the hook.
#4. Half Double Crochet (hdc)
THE half double crochet stitch or HDC points It is a favorite stitch for many as it has some height but is also quick to work.
- Yo (loop) insert hook from front to back of designated point
- Yo the hook and grab a loop.
- Yo the hook and pull back through all three loops on the hook.
#5. Double Crochet Stitch (sc)
Double Crochet Stitches are fun to learn because it's the next step up from half double crochet. You'll quickly realize how much faster it is to finish crochet projects when you're using a double crochet over the other stitch types.
- Wrap the yarn over the needle, insert the needle at the specified point.
- Draw the loop through the hook again, draw the yarn through the stitch, so that there are 3 loops on the hook.
- YO the hook again draw it through 2 loops, so there are 2 loops on the hook
- YO the hook, take it through the final 2 loops.
#6. Triple Crochet Stitch (tr)
THE crochet stitch treble or triple crochet stitch (also known as triple crochet), one of the tallest crochet stitches you can create. This is usually the next stitch you want to learn after the DC stitch.
- Make a chain of a desired length from any #
- Draw the loop twice over the hook, needle idle in the next designated stitch (the fifth chain from the hook for the first TR of a project )
- YO, draw through the point ( four turns on the hook )
- YO, yarn through two loops on the hook. ( three turns on the needle )
- YO, pass the yarn through two loops on the needle ( two turns on the needle )
- YO, yarn through two loops on the needle
You have made a Triple Crochet Stitch! Now to continue: YO twice and repeat steps 2-6 on the next chain or stitch.
More Crochet Techniques for Beginners + Skills to Know
To further expand your crochet skills, I recommend learning how to read crochet patterns, crochet abbreviations, and more below.
How to Read a Crochet Pattern
One of the first things you need to do after you have all the tools of the trade is to understand how crochet patterns are written and how you should read them. Most crochet patterns feature extensive use of abbreviations and everyone has one common outline.
Crochet patterns can be written in American crochet terms or UK crochet terms. The stitches and techniques below will be shown in American Crochet Terms (or US Standard Terms). A better explanation of these terms can be found in the Skills to Know section.
Crochet Abbreviations in Patterns
Crochet abbreviations are a way to shorten the name of a crochet stitch or certain crochet actions within crochet patterns. There are even punctuation combinations that are abbreviations for repeatable actions. For example, abbreviated single crochet will be written as sc. Many crochet designers (including myself on my crochet blog), publishers, and companies will use these standard US abbreviations (or American crochet terms) when referring to various crochet stitches and actions.
It’s essential to understand what these abbreviations mean because most crochet patterns only refer to stitches and actions in an abbreviated form. You can take a look above in the crochet stitch section to see the abbreviations I used, or click on the link above to also learn all about crochet stitch abbreviations.
Crochet weaving in yarn ends
Once you’ve finished all of the stitches in your new crochet project, you’ll have a few loose ends. The next step is to secure and hide them. Weaving in yarn ends is a method used to secure and hide yarn ends (the cut ends) by sewing them back in and through a crochet project. Here’s a quick and easy tutorial on how to weave in those pesky ends below.
How to Weave in Ends in Crochet
- Attach the end of the cut yarn (or the working yarn) to the yarn needle and weave horizontally across your work.
- Change directions several times, then weave the yarn vertically in the opposite direction as many times as you can before cutting the yarn with scissors close to the project.
The importance of the template in crochet
The meter is a measure of how many stitches and rows fit in the length of a crochet piece. This crochet piece is usually 4 inches (or about 10 cm) and is used to indicate the size of each stitch. If I can recommend nothing else, remember that getting the meter right is extremely important.!
If you get more stitches than the pattern gauge, it means your crochet is too tight. If you get fewer stitches than the pattern gauge, your crochet is too loose. Understanding how your personal tension affects the meter is fundamental. Expert tip: make sure the gauge is followed for a perfectly shaped project.
Joining Threads in Crochet
Joining the wire is the method of insert a new ball or ball of yarn when you crochet to the end of the current yarn. You can see our tutorial on how to change colors in crochet, which will help you when you want to not only change colors, or go wireless in a project.
How to Keep Track of Crochet Stitches
The best way to keep track of crochet stitches and rows in crochet projects is by using a stitch marker or (sm) for short. A stitch marker is a small tool that is used in crochet and knitting to help keep track of a stitch while working on a pattern. Stitch markers can be made of metal, plastic, or even scraps of yarn. Anything that can be used to mark the location of a stitch can be considered a stitch marker.
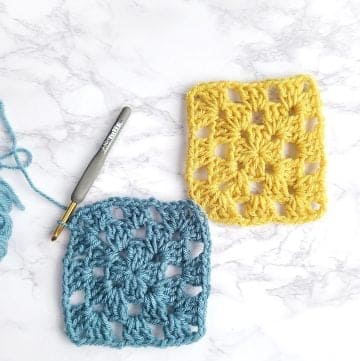
Good first crochet project for beginners
One beginner granny square is a great project for a newer crocheter. It uses double crochet stitches in groups to make the square. It can also use a magic circle, also known as a magic ring, to start the square, so it has a continuous circle to start the project.
Step by step tutorial on how to crochet for beginners
The step-by-step beginner tutorial below will teach you how to crochet a single row of crochet. Use this single crochet tutorial with step by step photos and a video tutorial of this stitch for beginners.
- Choose your yarn
- Choose the needle that matches the yarn
- Hold the hook with your dominant hand (left hand or right hand)
- Make a slipknot
- Chain 9
- In the second chain stitch from the needle, single crochet
- Single crochet in each chain
- At the end of the row, make 1 chain and turn your work, also known as turning
- Chain 1 and repeat steps 6-8 to complete another row
Once you’ve familiarized yourself with the terms and resources above, you’ll be ready to make your own crochet project and apply the new skills you’ve learned, such as granny squares, simple blankets, crochet hats, and more! These free patterns and free crochet projects are broken down by yarn weight, yarn type, brand, skill level, and more!
Did you like this amazing tip? If so, share it with your friends and on your social networks. Leave your comment below and your suggestions. Receive it daily here on our website. Blog of ideas and tips free and follow us on Google News too. Thank you!