
Have you ever found yourself alone in a construction or renovation project and needed to take a level perfect without help? Well, this can be a challenge, but today I want to share an amazing tip for leveling surfaces using a hose, without needing a helper. This technique is especially useful for those who don't have a hand level and want to ensure precision in their work.
In this post, I'll show you how you can make a level yourself in a simple and effective way, using materials that you probably already have at home. Follow along and discover how this tip can make your life easier when it comes to strapping or other jobs that require leveling. Let's go!
How to Take a Level with a Hose Yourself
Preparing the Materials
To get started, you will need:
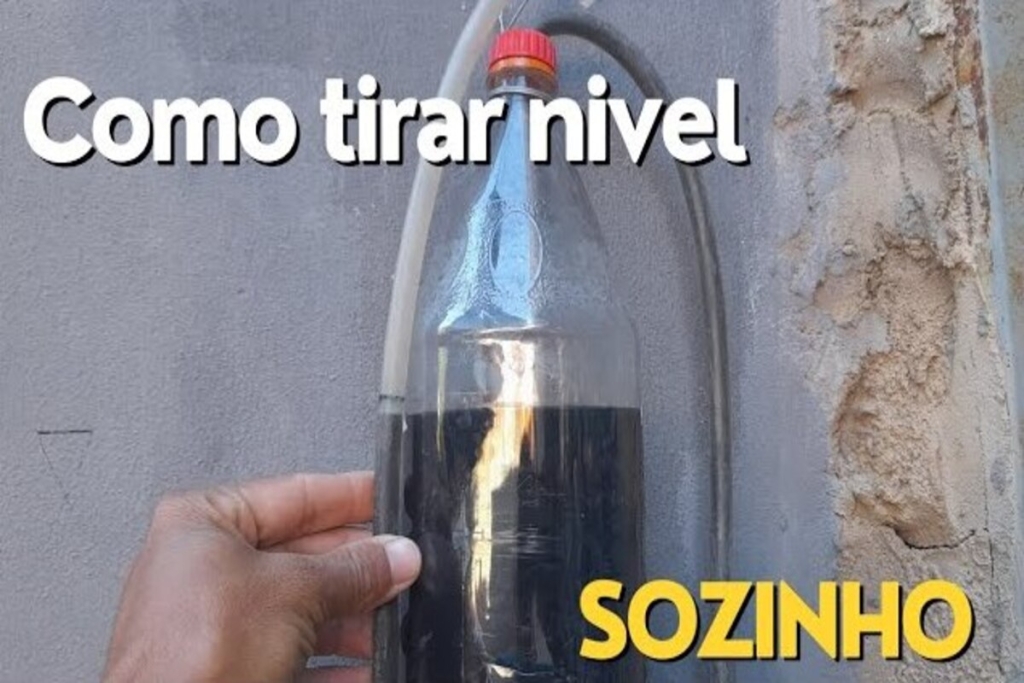
- A 1 liter bottle
- Pigment (can be black or blue)
- A drill or a hot iron
- Galvanized wire
- A hose
First of all, it is essential to make sure that you have all of these materials on hand. The bottle will be the main water reservoir, while the pigment will help you see the water level more easily. The drill or hot iron will be used to make a hole in the bottle cap, allowing the hose to enter. The galvanized wire will be used to secure the bottle in a stable, elevated position.
Drilling and Bottle Preparation
First, drill a hole in the bottle cap with a drill or hot iron. Add the pigment to the water inside the bottle to make it easier to see the level. Stir well so that the water is completely pigmented.
Drilling should be done carefully to ensure the hole is the right diameter for the hose to pass through without any gaps. Adding the pigment to the water is a crucial step, as colored water makes it much easier to see the level in different lighting conditions.
Bottle Fixation
Tie the bottle with galvanized wire and secure it to a high place using a nail. It is important that the bottle is securely fastened and at a convenient height for work.
Choose a secure, stable location to secure the bottle. It should be high enough to allow the hose to reach all areas that need to be leveled. Make sure the bottle is securely attached to prevent any movement during the process.
Hose Preparation
Fill the hose with water until there are no air bubbles. It is crucial that the hose is completely filled with water to ensure the level is accurate. To do this, suck the water until it is completely drained through the hose.
Removing all air bubbles is essential to ensure that the level measurement is accurate. Air bubbles can cause variations in the water level, resulting in incorrect measurements.
Marking the Level
Use a permanent marker to make marks on the hose and bottle where the water stops. This will help ensure that when you lift the hose, you have an accurate reference point.
These marks are essential for maintaining precision at different points on the wall or surface being leveled. Every time you lift the hose, the water must stop at exactly the same marked point.
Testing the Level
Lift the hose and observe the movement of the water. Even if the difference is only a few millimeters, it is important to adjust so that the water stops exactly at the marker. This will ensure that the level is accurate at different points on the wall or surface.
Test the accuracy of the level at several points to ensure it is working properly. Adjust as necessary until the water stops at the same marked point each time.
Additional Tips
- Use a long hose for work on larger surfaces.
- Check the level with a tape measure to ensure accuracy when filling the belt or carrying out other work.
- Always check that there are no air bubbles in the hose before starting leveling.
- If possible, mark with a high-quality permanent marker to prevent the ink from fading over time.
Frequently Asked Questions
1. Why use pigment in water?
The pigment makes it easier to see the water level inside the hose, ensuring greater precision in your work. With colored water, it is much easier to identify the exact point where the water stops, even in low light conditions.
2. How important is it to not have bubbles in the hose?
Air bubbles can alter the accuracy of the level, so it is essential that the hose is completely filled with water. Air bubbles create voids that can lead to incorrect measurements.
3. Can I use any type of wire?
It is recommended to use galvanized wire, as it does not rust and ensures greater durability. Galvanized wire is weather and corrosion resistant, ensuring that the bottle attachment remains secure for longer.
4. How do I mark the level accurately?
Use a permanent marker to make marks on the hose and bottle where the water stops. This will help you maintain accuracy. It's important to use a marker that won't fade or smudge easily.
5. How long does it take to prepare all the material?
The preparation process is quick and only takes a few minutes, as long as you have all the materials on hand. The most time-consuming part is making sure there are no air bubbles in the hose.
6. Can I use this technique for large surfaces?
Yes, simply use a longer hose to reach all the necessary areas. Make sure the hose is long enough to cover the entire surface that needs to be leveled.
Did you like this amazing tip? If so, share it with your friends and on your social networks. Leave your comment below and your suggestions. Receive it daily here on our website. Blog of ideas and tips free and follow us on Google News too. Thank you!